Friday, August 9, 2013

When Framing Becomes Walls


Today we put plywood sheathing on the walls. This is a pretty easy, straightforward task. It took three of us a few hours. The hardest part is getting the first piece of plywood up. It was important that this one was perfectly straight, otherwise the pieces would have kept getting more and more crooked as we went.


Holding each sheet of plywood up at the right height while someone else puts in a couple of screws, is kind of awkward. Once we get the hang of it though, it went pretty fast.


We put subfloor adhesive where the edges of each sheet would land and then secured the plywood with screws. Most people who have built these things recommend some kind of adhesive and screws. Screws are a lot harder to pull out than nails (as you probably know) which is good thing when you are driving down the highway.  ;)

The windows were cut out last with the sawsall.

I love the way I can get a sense of how the house feels inside once the plywood is up. I even moved a camp chair into the living room-to-be and hung out for a while, imaging where things will go when I'm done. Before it was time to head in, I spent a few minutes leaning on the windowsill enjoying the sunset.

Wednesday, August 7, 2013

Framed!

Today we framed up all four walls. It's amazing how quickly a bare trailer can turn into a building. Despite the heat, we managed to finish with enough time to go for a run and jump in the creek. Heavenly.

Building walls is definitely the most complicated thing we've done (I'll probably say that a few more times). Not only that, it involves lots of strange jargon (kind of like trying to understand gamer speak). Today was a learning process for sure.


      The first step was to create the layout. As you can see we laid two 2x4's (16') on the deck. These would eventually be cut up and serve as the bottom and top of our walls. On these we marked the location of every vertical 2x4. Studs, on 24in centers (24in apart), were marked first. Then the windows and doors were marked. The photo below shows the layout of a window.
 
Here's your first lesson in builder lingo:
K= king, this is the tallest stud on the each side of a window
T= trimmer, this is a slightly shorter stud that holds up the header over the window. It gets
      nailed to the king stud.
CL=center line, this is the center of the window.  The faint line and X mark the location of a stud. This stud is know as a cripple because it's a short one under the windowsill.
 
I wish I knew who named these things!


 We built all the K/T's (king/trimmers) first. Eight total, two per window. This was easy, all the trimmers are the same height because the tops of the windows are all level.
We also built four Cali's, which formed the corners. I'm not entirely sure what purpose they serve, but what my dad say's, goes. One is shown in the picture on the right.   
            

Here's the window I mentioned before, put together. The two outside studs are kings. The next ones in, holding up the header, are trimmers. The next two in hold up the sill. The other one under the sill is the cripple.

My first reaction to the cripple was "What's the point? There's another stud three inches away"
However, there is some logic to it. When it comes time to put plywood on, each piece needs to land on a stud. Plywood comes 4' wide, studs are 2' apart, everything lines up.

Walls are built lying flat and then lifted into place. We used bracing to hold the long sides in place while we built the others. We used a level to make sure the walls were absolutely straight (or plumb) and then screwed the braces in.

This was the fun part. My house suddenly appeared!


Here's a close-up of the header. Later we will put a piece of 1/2in foam and another 2x6 in there.
This is how we built the wall over the wheel wells. Unfortunately, the wheels create a bump on the inside of the house but this is unavoidable with an 8' wide trailer.
Measuring for the wall over the wheel well. It was the last wall to be built.

The last step is to put on the top plate. This is one long 2x4 that runs the whole length of the building. It ties all the walls sections together and lines them up.
Make sure all the walls are plumb first! Once the top plate is nailed in the walls can't be shifted.


Tah Dah! I have a house!

(Time for a popsicle)


Monday, August 5, 2013

The Adventure Begins

We finally started building today! It is amazing how quickly things happen with four people working. We got the whole floor in!


 My trailer has kind of an unusual design which presented some challenges putting the floor in.


 We covered the deck with pressure treated plywood, then screwed the plywood down with wood-to-metal screws. I could not get the hang of putting them in. Luckily, the rest of my family did. I caulked all the seams while they screwed.
  
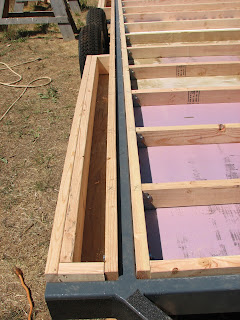
The next step was to bolt 2x6's the whole length of the
trailer. This proved to be difficult as well, because it meant
drilling through metal. I wanted the weight of the house to
be on the main frame, not the lighter metal that was only
tack-welded on. (you can see what I mean in the first
picture) Hence the extra work of bolting on 2x6's.

 Next we laid down 2in foam board and hung 2x4 floor joists off the 2x6's.

 All those hangers were good hammer swinging practice. Efficient hammering really is an art!
 This is a good picture of the finished subfloor. It also shows how we framed the outside edges.


Next up was the insulation. We used Eco Batts fiberglass insulation. Fiberglass is nasty (even if it's "eco"), so we're wearing long sleeve's despite the 90 degree weather.


The final step was to put down another layer of plywood.
A big thank you to my family, especially my dad, for giving up their weekend. His building expertise is making this project possible.

An Introduction

Several years ago, my dad brought home Jay Shafer's Tiny House Book. I was struck by the practicality and coziness of living in just enough space. Plus, they were really cute. I couldn't get the idea of building one of these houses out of my head. I started drawing plans, and more plans. Long story short, I decided to build one of these houses for my senior project. When it is finished, I will sell it and put the money toward college. So I've decided on my plan, bought a trailer and begun. I hope to use this blog to document my progress and spread the word about what I am doing.
Enjoy.